性能测试工具 IxChariot:Tcl脚本调用方法介绍

ixChariot是一款功能强大的性能测试软件,可用来测试有线和无线性能,可以模拟真实应用程序流量,并提供关键性能指标,包括吞吐量、丢包、抖动、延迟、MOS等。本文简单介绍如何使用IxChariot Tcl API来实现自动化跑流。

IxChariot测试网络

一个基本的IxChariot测试网络主要包括三个部分:

  • IxChariot控制端:可以安装IxChariot软件的Windows PC
  • Endpoint 1:接收IxChariot控制端的测试脚本和数据,与Endpoint 2 进行跑流测试,并将所有测试结果返回到IxChariot控制端。
  • Endpoint 2:与Endpoint 1通信,接收Endpoint 1的测试脚本和数据,并将测试结果返回给Endpoint 1

通常在IxChariot控制端电脑的IxChariot软件配置跑流脚本,在Endpoint 1Endpoint 2 两个电脑上安装并启动Endpoint。然后就可以在IxChariot控制端运行跑流脚本,测试结果会返回到控制端。

IxChariot软件页面的手动配置这里就不介绍了,下面主要介绍如何使用Chariot API来实现自动化跑流。

IxChariot API简介

IxChariot API支持使用C语言和Tcl脚本来驱动IxChariot跑流,我们可以通过IxChariot API来创建、执行、保存和提取测试结果。

下图是IxChariot包与IxChariot API、endpoint之间的工作流程。

IxChariot API中的对象是分层的,其包含的分层结构如下图:

以下对象在测试对象中单独实例化,然后添加到测试对象示例中:

pair

hardware pair

VoIP pair

VoIP hardware pair

application group

video pair

multicast group

video multicast group

multicast pair

channel

receiver

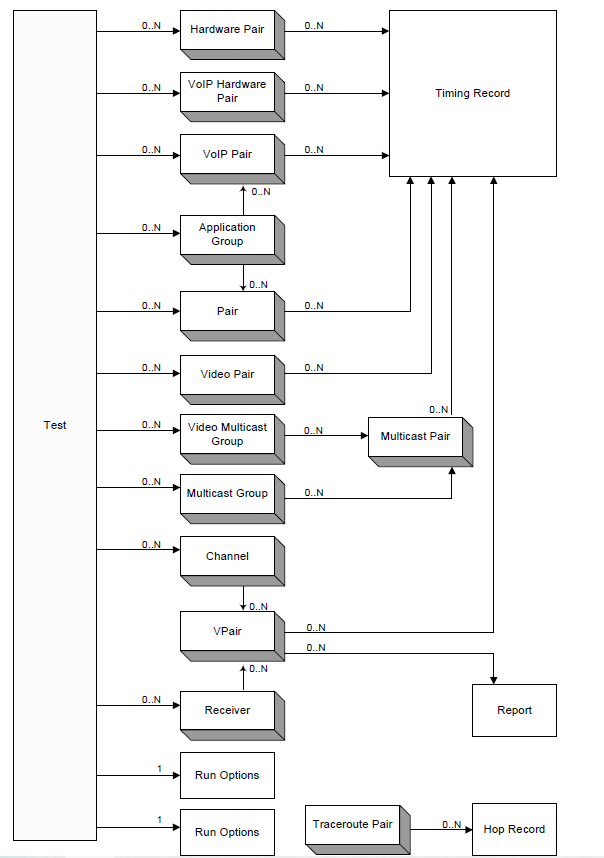
IxChariot测试必须至少包含一个 pair 对象:pair,hardware pair, VoIP pair, video pair, multicast group, 或者 video multicast group对象实例。当测试开始执行时,会自动创建时间记录(timing record)对象实例。

IxChariot Tcl包提供的方法可在帮助文档中查看。

IxChariot环境安装

本文主要介绍IxChariot Tcl API的简单使用,这里介绍Tcl跑流的环境安装步骤。

1. 安装IxChariot

在IxChariot控制端电脑(Windows系统)上安装,我使用的是默认安装路径:C:\Program Files (x86)\Ixia\IxChariot

2. 安装endpoint

安装系统平台对应的endpoint,支持Windows、Linux和macOS系统。

1、Windows系统安装

Windows系统双击安装即可。

启动endpoint的cmd命令:

1
$ net start IxiaEndpoint

停止endpoint进程的cmd命令:

1
$ net stop IxiaEndpoint

2、Linux系统安装

Linux rpm包安装方法:

1
$ rpm -ivh pelinux_amd64_95.rpm

Linux 源码包安装方法:

1
2
3
$ cd endpoint
$ tar -xvzf pelinux_amd64_730.tar.gz
$ ./endpoint.install accept_license

启动endpoint:

1
$ setsid  /usr/local/Ixia/endpoint

停止endpoint进程:

1
$ /usr/local/Ixia/endpoint –k

3. 安装Tcl

使用IxChariot Tcl API时,建议在命令行执行Tcl脚本来运行IxChariot:

1
$ tclsh myTest.tcl

因此需要安装一下Tcl环境,Tcl下载地址:https://www.tcl.tk/software/tcltk/download.html

安装完成后,需要将tcl安装bin目录添加到环境变量。

IxChariot Tcl API

下面列举一些 IxChariot Tcl 包创建普通 pair 的一些常用方法。

chrRunOpts

用于定义和获取测试运行选项,比如设置跑流时间:

1
2
3
4
5
set test [chrTest new]
#设置测试时间值
set runOpts [chrTest getRunOpts $test]
chrRunOpts set $runOpts TEST_END FIXED_DURATION
chrRunOpts set $runOpts TEST_DURATION 30

必须将 TEST_END 设置为 FIXED_DURATION时,TEST_DURATION 值才会生效。

chrPair set

设置pair属性

1
2
3
chrPair set pair1 PROTOCOL $pro; # 设置协议
chrPair set pair1 E1_ADDR IP地址; # 设置Endpoint 1 address
chrPair set pair1 E2_ADDR IP地址; # 设置Endpoint 2 address

chrPair useScript

给pair设置测试脚本

1
chrPair useScript pair1 Throughput.scr;

chrPair setScriptVar

设置脚本变量,比如

1
2
3
chrPair setScriptVar pair1 file_size $filesize};#发送字节数
chrPair setScriptVar pair1 send_buffer_size $buffersize; # buffer大小
chrPair setScriptVar pair1 send_data_rate $datarate};#发送速率

读取结果

可以使用 chrCommonResults getchrPairResults get 方法来读取测试结果。

1
2
set runingtime [chrCommonResults get pair1 MEAS_TIME; # 运行时间
set throughput [chrPairResults get pair1 THROUGHPUT; # THROUGHPUT结果

更多API用法可参考接口文档,下面列举创建pair和VoIPPair的示例。

Tcl脚本示例

pair创建实例

1
2
3
4
5
6
7
8
9
10
11
12
13
14
15
16
17
18
19
20
21
22
23
24
25
26
27
28
29
30
31
32
33
34
35
36
37
38
39
40
41
42
43
44
45
46
47
48
49
50
51
52
53
54
55
56
57
58
59
60
61
62
63
64
65
66
67
68
69
70
71
72
73
74
75
76
77
78
set e1 "localhost"
set e2 "localhost"
set script "c:/Program Files/Ixia/IxChariot/Scripts/Throughput.scr"
set testFile "c:/Program Files/Ixia/IxChariot/tests/lbtest.tst"
set timeout 60

# (1)加载Chariot包
load ChariotExt
package require ChariotExt

# (2)创建测试对象
set test [chrTest new]
set runOpts [chrTest getRunOpts $test]
chrRunOpts set $runOpts TEST_END FIXED_DURATION
chrRunOpts set $runOpts TEST_DURATION $timeout; #设置测试运行时间

# (3)创建pair对象
set pair [chrPair new]

# (4)设置pair属性
chrPair set $pair E1_ADDR $e1 E2_ADDR $e2
chrPair set $pair PROTOCOL TCP; #设置协议

# (5)设置测试脚本
chrPair useScript $pair $script
chrPair setScriptVar $pair file_size 1000000;#发送字节数
chrPair setScriptVar $pair send_buffer_size 1500;#buffer大小
chrPair setScriptVar $pair send_data_rate "20 Mb";#发送速率

# (6)添加pair到测试对象中
chrTest addPair $test $pair

# (7)运行测试
chrTest start $test

# (8)等待测试结束
set $timeout [expr 10 + $timeout]
if {![chrTest isStopped $test $timeout]} {
puts "ERROR: Test didn’t stop"
chrTest delete $test force
return
}

# (9)打印

puts "==========="
puts "Test setup:\n----------"
puts "Number of pairs = [chrTest getPairCount $test]"
puts "E1 address : [chrPair get $pair E1_ADDR]"
puts "E2 address : [chrPair get $pair E2_ADDR]"
# We didn’t set the protocol, but let’s show it anyway.
puts "Protocol : [chrPair get $pair PROTOCOL]"
# We’ll show both the script filename and
# the application script name.
puts "Script filename : [chrPair get $pair SCRIPT_FILENAME]"
puts "Appl script name: [chrPair get $pair APPL_SCRIPT_NAME]"

# (10)读取测试结果: 吞吐量
puts ""
puts "Test results:\n------------"
puts "Number of timing records = \
[chrPair getTimingRecordCount $pair]"

set throughput [chrPairResults get $pair THROUGHPUT]
set avg [format "%.3f" [lindex $throughput 0]]
set min [format "%.3f" [lindex $throughput 1]]
set max [format "%.3f" [lindex $throughput 2]]
puts "Throughput:"
puts " avg $avg min $min max $max"

# (11)保存测试结果
puts "Save the test..."
chrTest save $test $testFile

# (12)清理
chrTest delete $test force

return

VoIPPair创建实例

1
2
3
4
5
6
7
8
9
10
11
12
13
14
15
16
17
18
19
20
21
22
23
24
25
26
27
28
29
30
31
32
33
34
35
36
37
38
39
40
41
42
43
44
45
46
47
48
49
50
51
52
53
54
55
56
57
58
59
60
61
62
63
64
65
set e1 "localhost"
set e2 "localhost"
set timeout 60

# (1)加载Chariot包
load ChariotExt
package require ChariotExt

# (2)创建测试对象
set test [chrTest new]
set runOpts [chrTest getRunOpts $test]
chrRunOpts set $runOpts TEST_END FIXED_DURATION
chrRunOpts set $runOpts TEST_DURATION $timeout; #设置测试运行时间

# (2)创建voippair对象
set voippair1 [chrVoIPPair new]; # VoIP Pair创建

# (3)设置pair属性
chrPair set $voippair1 E1_ADDR $e1 E2_ADDR $e2
chrPair set $voippair1 QOS_NAME "VoIPQoS";
chrVoIPPair set $voippair1 CODEC "G711u";

# (4)添加voippair1到测试对象中
chrTest addPair $test $voippair1

# (5)运行测试
chrTest start $test

# (6)等待测试结束
if {![chrTest isStopped $test $timeout]} {
puts "ERROR: Test didn’t stop in 2 minutes!"
chrTest delete $test force
return
}

# (7)读取测试结果
# MOS
set mos [chrPairResults get $voippair1 MOS_ESTIMATE]
set mos_avg [format "%.3f" [lindex $mos 0]]
puts "MOS_avg $mos_avg"

# 时延
set delay [chrPairResults get $voippair1 END_TO_END_DELAY]
set delay_avg [lindex $delay 0]
set delay_avg [format "%.1f" $delay_avg]
puts "END_TO_END_DELAY $delay_avg"

# 丢包率
set bytes_recv_e2 [chrCommonResults get $voippair1 BYTES_RECV_E2]
# puts ""
# puts "BYTES_RECV_E2: $bytes_recv_e2"
set bytes_sent_e1 [chrCommonResults get $voippair1 BYTES_SENT_E1]
# puts "BYTES_SENT_E1: $bytes_sent_e1"
set bytes_lost_rate [format "%.4f" [expr ($bytes_sent_e1 - $bytes_recv_e2)/$bytes_sent_e1]]
set bytes_lost_rate [expr $bytes_lost_rate*100]
puts "BYTES_LOST_RATE $bytes_lost_rate"

# (11)保存测试结果
puts "Save the test..."
chrTest save $test $testFile

# (12)清理
chrTest delete $test force

return

其它

执行tst文件

可以使用runtst工具来执行创建的tst文件:

1
2
$ cd C:\Program Files (x86)\Ixia\IxChariot
$ runtst.exe -t20 C:\\Users\DELL\\Documents\\IxChariot\\TESTS\\demo.tst d:\\test\\demo.tst

Python执行TCL脚本

除了使用Python的 os.popen 或者 subprocess.Popen 调用编写好的Tcl脚本执行测试外,也可以使用Python的Tcl库来执行Tcl命令:

1
2
3
4
5
6
from Tkinter import Tcl

tcl = Tcl()
# 加载ChariotExt库
tcl.eval("load ChariotExt")
tcl.eval("package require ChariotExt")

注意:

  1. 执行此Python脚本的电脑必须安装好IXChariot控制端软件,否则无法加载ChariotExt.dll动态链接库。
  2. 如果ChariotExt.dll为32位VC++环境编译,Python也需要32位。
--THE END--

本文标题:性能测试工具 IxChariot:Tcl脚本调用方法介绍

文章作者:hiyo

文章链接:https://hiyongz.github.io/posts/performance-testing-with-ixchariot/

许可协议:本博客文章除特别声明外,均采用CC BY-NC-ND 4.0 许可协议。转载请保留原文链接及作者。

关注微信公众号,及时接收最新技术文章!