Gerrit是一款开源免费的基于 web 的代码审查工具,是基于 Git 的版本控制系统。在代码入库之前对开发人员的提交进行审阅,检视通过的代码才能提交入库。本文记录如何安装部署gerrit平台。
Gerrit简介
Gerrit代码审查工具也是一个Git服务器,使用Git作为底层版本控制系统,当前的版本使用Java开发。
一个典型的Git项目包含一个远程中央仓库,
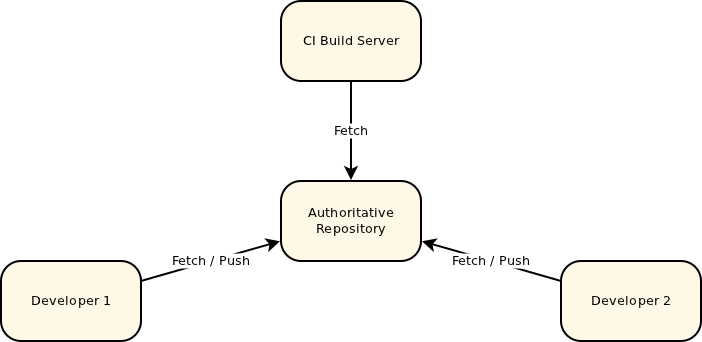
Gerrit在Git中央仓库基础上引入了一个额外的概念:存储修改的暂存区,
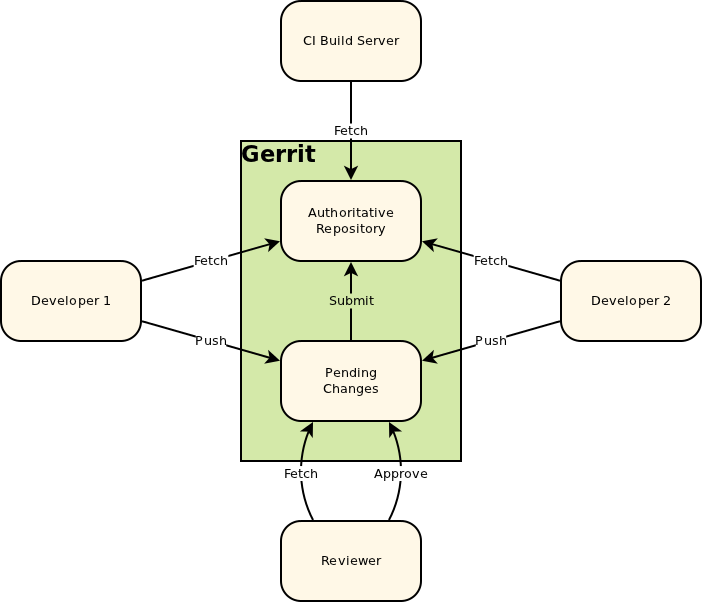
push的代码更改会被存储到暂存区(Pending changes),其他人评审通过后就可以将更改提交到代码库 (Authoritative Repository)。
下面介绍如何安装部署gerrit。
环境准备
本文介绍Linux中gerrit的安装配置方法,Windows安装可参考官方文档:https://gerrit-documentation.storage.googleapis.com/Documentation/3.7.2/install.html
1. 安装Java
Linux服务器需要先安装好Java环境
1 | $ yum -y install java-11-openjdk.x86_64 |
2. 安装Git
安装最新版本git
1 | $ git --version |
3. 安装nginx
安装nginx用于反向代理。
1、下载nginx安装包nginx-1.22.1.tar.gz:http://nginx.org/en/download.html
2、解压:
1 | $ tar -xvzf nginx-1.22.1.tar.gz |
3、安装:
1 | $ cd nginx-1.22.1 |
4、启动nginx:
1 | $ cd /usr/local/nginx/sbin |
或者使用命令 systemctl start nginx.service 启动。
浏览器访问:http://192.168.30.8/

关闭nginx命令:
1 | $ ./nginx -s stop |
刷新配置文件:
1 | $ ./nginx -s reload |
其中配置文件路径为:/usr/local/nginx/conf/nginx.conf
接下来配置nginx开机启动:
在 /lib/systemd/system/ 目录下创建 nginx.service 文件:
1 | $ vim /lib/systemd/system/nginx.service |
输入如下内容:https://www.nginx.com/resources/wiki/start/topics/examples/systemd/
1 | [Unit] |
加入开机自启动
1 | $ systemctl enable nginx |
其它命令:
1 | $ systemctl reload nginx.service # 重新加载nginx配置 |
4. 安装Apache
安装Apache用于http认证
1 | $ yum install httpd |
Gerrit安装配置
1. 下载
gerrit各版本下载地址:https://www.gerritcodereview.com/releases-readme.html
war包下载完成后把它发送到Linux服务器,如果服务器可以联网,也可以直接执行以下命令下载:
1 | $ wget https://gerrit-releases.storage.googleapis.com/gerrit-3.7.2.war –no-check-certificate |
2. 安装
执行以下命令安装Gerrit:1
2
3
4
5
6
7
8
9
10
11
12
13
14
15
16
17
18
19
20
21
22
23
24
25
26
27
28
29
30
31
32
33
34
35
36
37
38
39
40
41
42
43
44
45
46
47
48
49
50
51
52
53
54
55
56
57
58
59
60
61
62
63
64
65
66
67
68
69
70
71
72
73
74
75
76
77
78
79
80
81
82
83
84
85
86
87
88
89
90
91
92
93
94
95
96
97
98
99
100
101
102
103
104
105
106
107
108
109
110
111
112
113
114$ cd ~/gerrit
$ export GERRIT_SITE=~/gerrit/gerrit_testsite
$ java -jar gerrit*.war init --batch --dev -d $GERRIT_SITE
$ java -jar gerrit*.war init -d $GERRIT_SITE
Using secure store: com.google.gerrit.server.securestore.DefaultSecureStore
[2023-04-02 09:58:38,456] [main] INFO com.google.gerrit.server.config.GerritServerConfigProvider : No /root/gerrit/gerrit_testsite/etc/gerrit.config; assuming defaults
*** Gerrit Code Review 3.7.2
***
*** Git Repositories
***
Location of Git repositories [git]:
*** JGit Configuration
***
*** Index
***
Type [lucene]:
*** User Authentication
***
Authentication method [openid/?]: oauth
Git/HTTP authentication [http/?]:
Enable signed push support [y/N]?
*** Review Labels
***
Install Verified label [y/N]? y
*** Email Delivery
***
SMTP server hostname [localhost]: smtp.163.com
SMTP server port [(default)]:
SMTP encryption [none/?]:
SMTP username [root]: XXXXXXXXX@163.com
XXXXXXXXX@163.com's password :
confirm password :
*** Container Process
***
Run as [root]:
Java runtime [/usr/lib/jvm/java-11-openjdk-11.0.16.0.8-1.el7_9.x86_64]:
Copy gerrit-3.7.2.war to /root/gerrit/gerrit_testsite/bin/gerrit.war [Y/n]?
Copying gerrit-3.7.2.war to /root/gerrit/gerrit_testsite/bin/gerrit.war
*** SSH Daemon
***
Listen on address [*]:
Listen on port [29418]:
Generating SSH host key ... rsa... ed25519... ecdsa 256... ecdsa 384... ecdsa 521... done
*** HTTP Daemon
***
Behind reverse proxy [y/N]?
Use SSL (https://) [y/N]? y
Listen on address [*]: 127.0.0.1
Listen on port [8443]: 8081
Canonical URL [https://127.0.0.1:8081/]: http://192.168.30.8:8081
Create new self-signed SSL certificate [Y/n]?
Certificate server name [192.168.30.8:8081]:
Certificate expires in (days) [365]: 36500
*** Cache
***
*** Plugins
***
Installing plugins.
Install plugin codemirror-editor version v3.7.2 [y/N]? y
Installed codemirror-editor v3.7.2
Install plugin commit-message-length-validator version v3.7.2 [y/N]? y
Installed commit-message-length-validator v3.7.2
Install plugin delete-project version v3.7.2 [y/N]? y
Installed delete-project v3.7.2
Install plugin download-commands version v3.7.2 [y/N]? y
Installed download-commands v3.7.2
Install plugin gitiles version v3.7.2 [y/N]? y
Installed gitiles v3.7.2
Install plugin hooks version v3.7.2 [y/N]? y
Installed hooks v3.7.2
Install plugin plugin-manager version v3.7.2 [y/N]? y
Installed plugin-manager v3.7.2
Install plugin replication version v3.7.2 [y/N]? y
Installed replication v3.7.2
Install plugin reviewnotes version v3.7.2 [y/N]? y
Installed reviewnotes v3.7.2
Install plugin singleusergroup version v3.7.2 [y/N]? y
Installed singleusergroup v3.7.2
Install plugin webhooks version v3.7.2 [y/N]? y
Installed webhooks v3.7.2
Initializing plugins.
============================================================================
Welcome to the Gerrit community
Find more information on the homepage: https://www.gerritcodereview.com
Discuss Gerrit on the mailing list: https://groups.google.com/g/repo-discuss
============================================================================
Initialized /root/gerrit/gerrit_testsite
$
其中 ~/gerrit 是我的gerrit安装路径,出现 Starting Gerrit Code Review: OK 表示启动成功。
gerrit配置文件路径为:/root/gerrit/gerrit_testsite/etc/gerrit.config,我的gerrit.config文件内容如下:
1 | [gerrit] |
停止命令:
1 | $ /root/gerrit/gerrit_testsite/bin/gerrit.sh stop |
启动命令:
1 | $ /root/gerrit/gerrit_testsite/bin/gerrit.sh start |
重启命令:
1 | $ /root/gerrit/gerrit_testsite/bin/gerrit.sh restart |
设置开机自动启动gerrit:
1 | $ sudo ln -snf /root/gerrit/gerrit_testsite/bin/gerrit.sh /etc/init.d/gerrit.sh |
修改文件 /etc/init.d/gerrit.sh 设置gerrit安装路径GERRIT_SITE:
1 | ################################################## |
然后执行:
1 | $ chkconfig --add gerrit.sh |
3. nginx反向代理
编辑nginx配置文件vim /usr/local/nginx/conf/nginx.conf,添加如下内容:
1 | server { |
auth_basic_user_file 是用来保存gerrit用户名密码的文件。
重新加载配置:
1 | $ systemctl reload nginx.service |
4. 创建用户名密码
使用 htpasswd 命令创建用户名密码:
1 | $ touch /root/gerrit/gerrit_testsite/etc/gerrit.password |
5. 启动
重启nginx:
1 | $ systemctl reload nginx.service |
重启gerrit:
1 | $ /root/gerrit/gerrit_testsite/bin/gerrit.sh restart |
启动成功后,浏览器访问gerrit:http://192.168.30.8/,其中192.168.30.8是我的服务器IP地址。
页面会弹出登录页面,输入创建的管理员用户名密码进行登录。

认证成功后会跳转到gerrit页面

6. 邮箱配置
登录成功后,进入’Settings’ > ‘Email Addresses’ 配置邮箱。
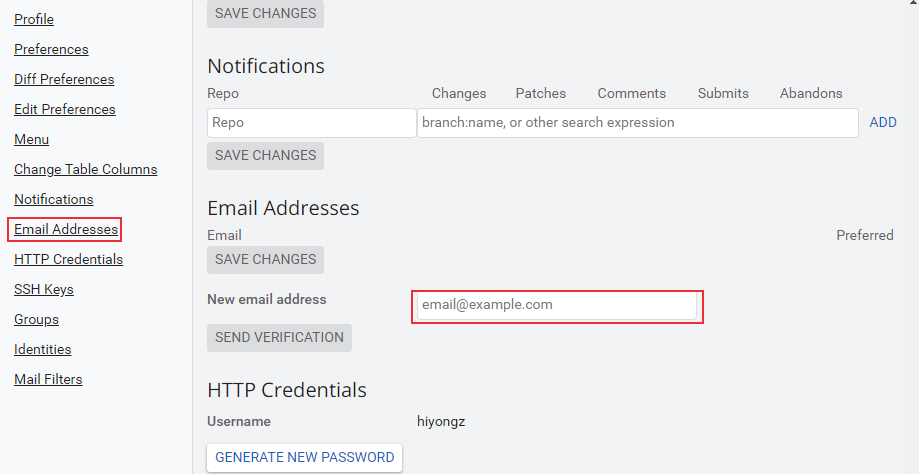
点击 ‘Send verification’ 后设置的邮箱会收到一封认证邮件
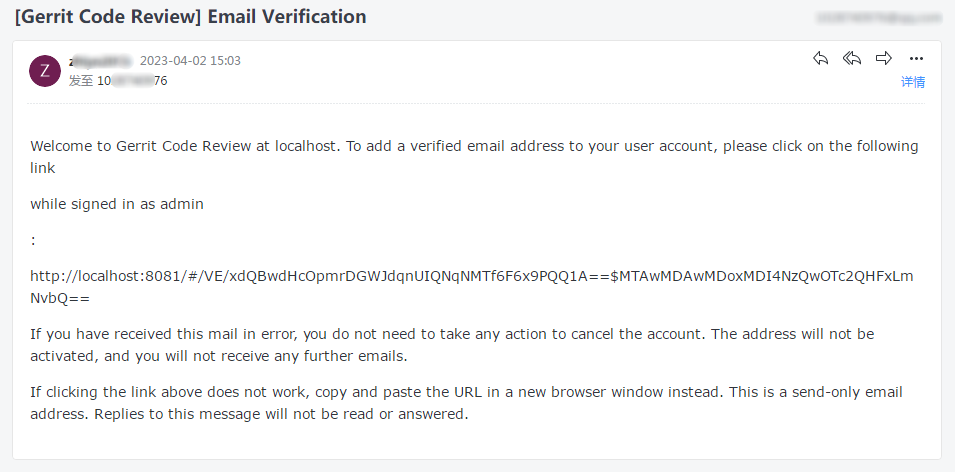
访问邮件中的链接(将localhost:8081改为主机地址192.168.30.8)http://192.168.30.8/#/VE/xdQBwdHcOpmrDGWJdqnUIQNqNMTf6F6x9PQQ1A==$MTAwMDAwMDoxMDI4NzQwOTc2QHFxLmNvbQ== 即可认证成功。
用户创建
和前面介绍的创建管理员账户一样,使用htpasswd 命令创建普通用户:
1 | $ htpasswd -b /root/gerrit/gerrit_testsite/etc/gerrit.password gerrit 123456 |
创建成功后使用用户名密码登录gerrit并配置邮箱即可。
创建项目仓库
主要有四种创建仓库方式:
1、Web页面进入’Browse’ > ‘Repositories’ > ‘CREATE NEW’
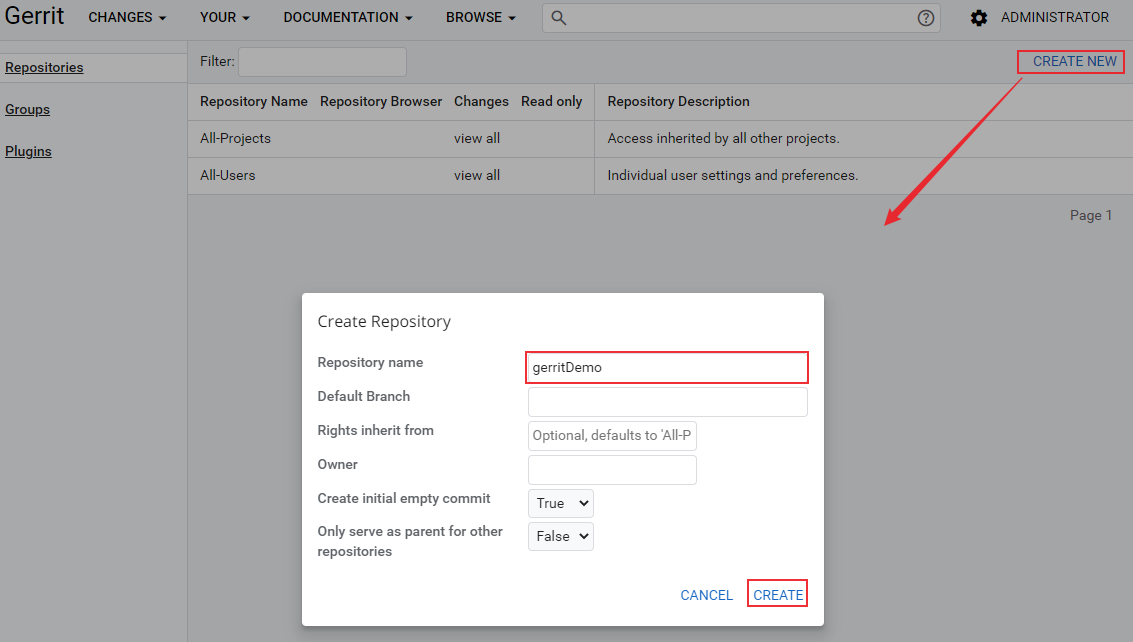
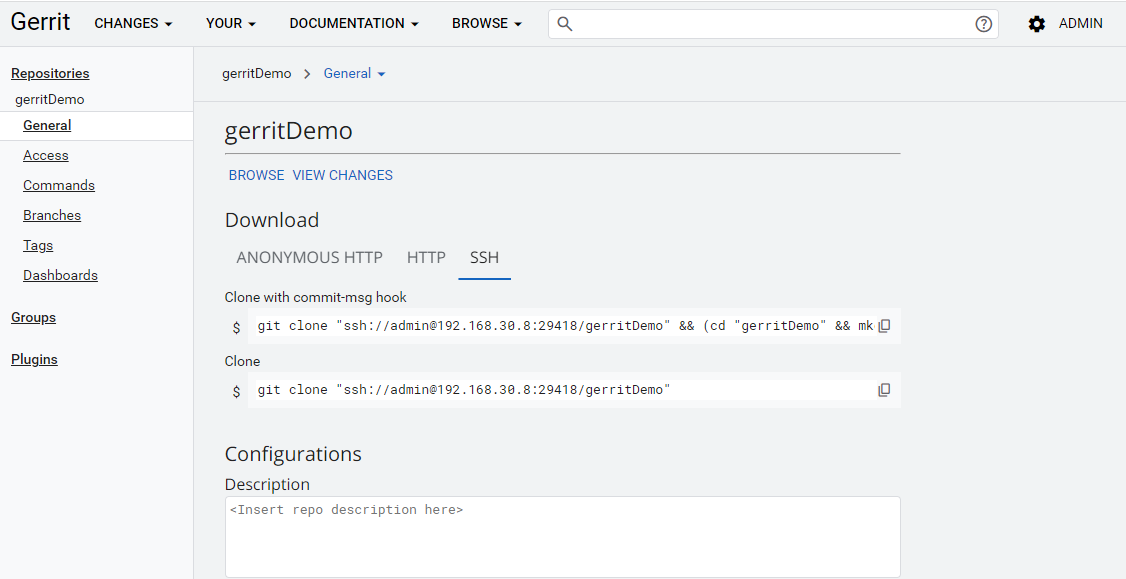
创建完成后进行仓库配置:
2、通过gerrit REST API创建
请求接口为 PUT /projects/{project-name},请求次数参考https://gerrit-documentation.storage.googleapis.com/Documentation/3.7.2/rest-api-projects.html#create-project
3、通过SSH 命令创建
1 | ssh -p <port> <host> gerrit create-project { <NAME> } |
可用参数选项可参考https://gerrit-documentation.storage.googleapis.com/Documentation/3.7.2/cmd-create-project.html
4、也可以直接在gerrit服务器上手动创建
Git ssh key配置
开发环境需要安装Git,Windows和Linux系统上Git安装方法可参考Git简易教程-安装及简单使用。gerrit支持HTTP和SSH两种方式克隆项目,本文介绍SSH认证方式的配置方法。
1. 创建 ssh key
这一步目的是在本地(开发电脑)生成用于认证的公钥和私钥。
由于安全原因,GIT 2.33 及之后的版本禁用了 ssh-rsa 公钥签名算法,可使用ed25519算法来生成秘钥:
1 | $ ssh-keygen -t ed25519 -C "123456789@qq.com" # 邮件地址是在gerrit平台上配置的邮箱 |
密码不用设置,回车即可:
1 | $ ssh-keygen -t ed25519 -C "123456789@qq.com" |
执行完成后会在 ~/.ssh 目录下生成id_ed25519(私钥)和 id_ed25519.pub(公钥)这两个秘钥文件。
进入 .ssh 文件夹下,可以看到生成的秘钥文件:
1 | $ cd ~/.ssh # 进入 .ssh 文件夹下 |
2. gerrit添加公钥
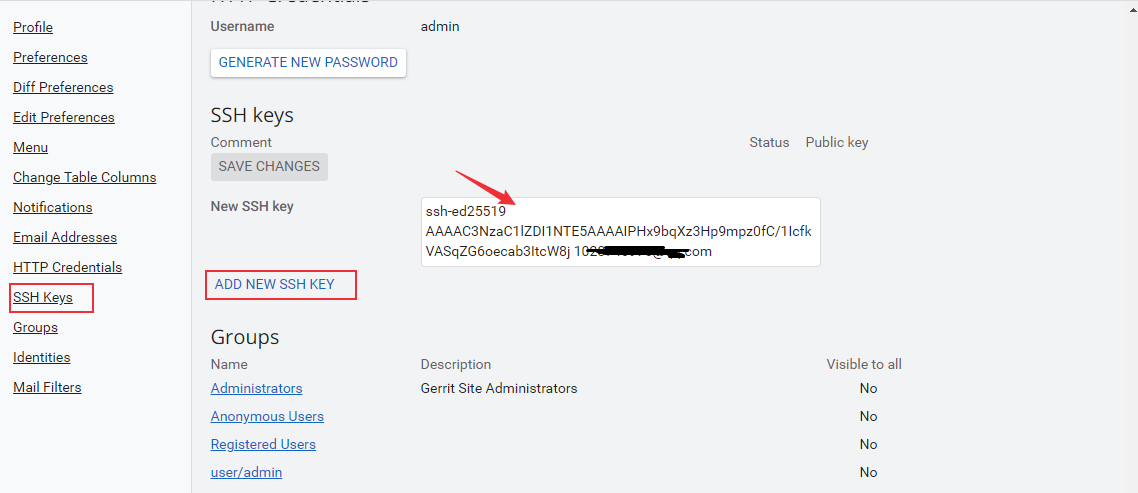
访问gerrit,将生成的公钥添加到Gerrit SSH Keys中。
复制公钥:
1 | $ cat id_ed25519.pub |
登录Gerrit,点击Setting,找到SSH Keys,粘贴复制的公钥,然后点击 ‘Add new SSH key’
3. 生成ppk私钥文件
ppk私钥文件用于使用git GUI 克隆代码时使用的秘钥文件。
进入 ~/.ssh 目录下,复制前面生成的私钥文件 id_ed25519 为后缀为ppk的文件:
1 | $ cp id_ed25519 id_ed25519.ppk |
打开PuTTYgen工具,点击【load】,加载复制的id_rsa_gerrit.ppk文件

导入成功后,点击【Save private key】保存私钥,可以新创建一个文件或者覆盖原来复制的ppk文件。
4. 添加私钥
打开Pageant工具,加载保存的私钥文件。

拉取项目仓库
公钥和私钥配置完成后,就可以克隆gerrit上的仓库了。登录gerrit,进入要克隆的仓库,选择ssh方式,复制clone命令。
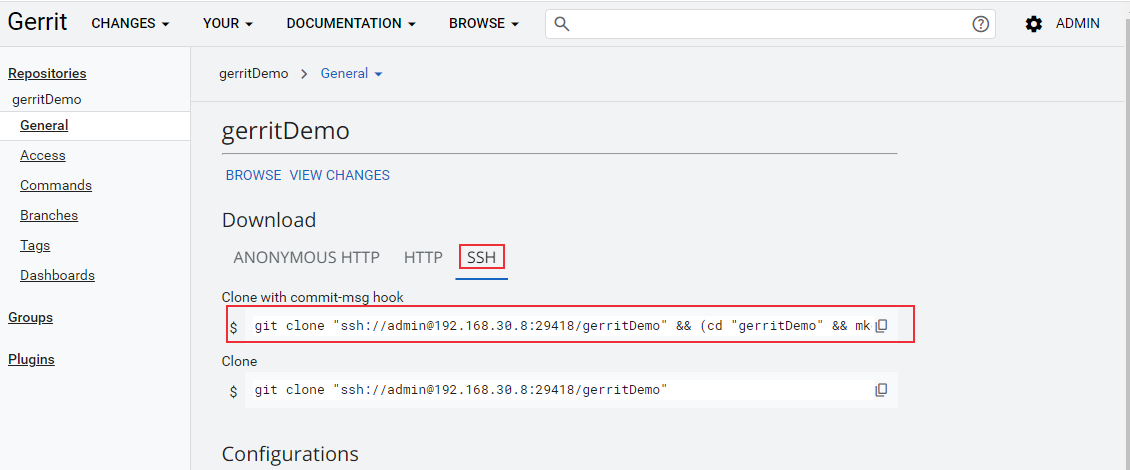
1 | $ git clone "ssh://admin@192.168.30.8:29418/gerritDemo" && (cd "gerritDemo" && mkdir -p `git rev-parse --git-dir`/hooks/ && curl -Lo `git rev-parse --git-dir`/hooks/commit-msg http://192.168.30.8:8081/tools/hooks/commit-msg && chmod +x `git rev-parse --git-dir`/hooks/commit-msg) |
上面的clone代码执行完成后,仓库 /.git/hooks 目录下面会有一个commit-msg钩子文件。
提交代码
提交示例:
1 | $ echo test > test.txt |
注意:push的远程分支为 refs/for/master,如果使用master分支会直接push到中央仓库,不会到暂存区。
审核代码
push成功后登录gerrit,可以看到刚才的提交

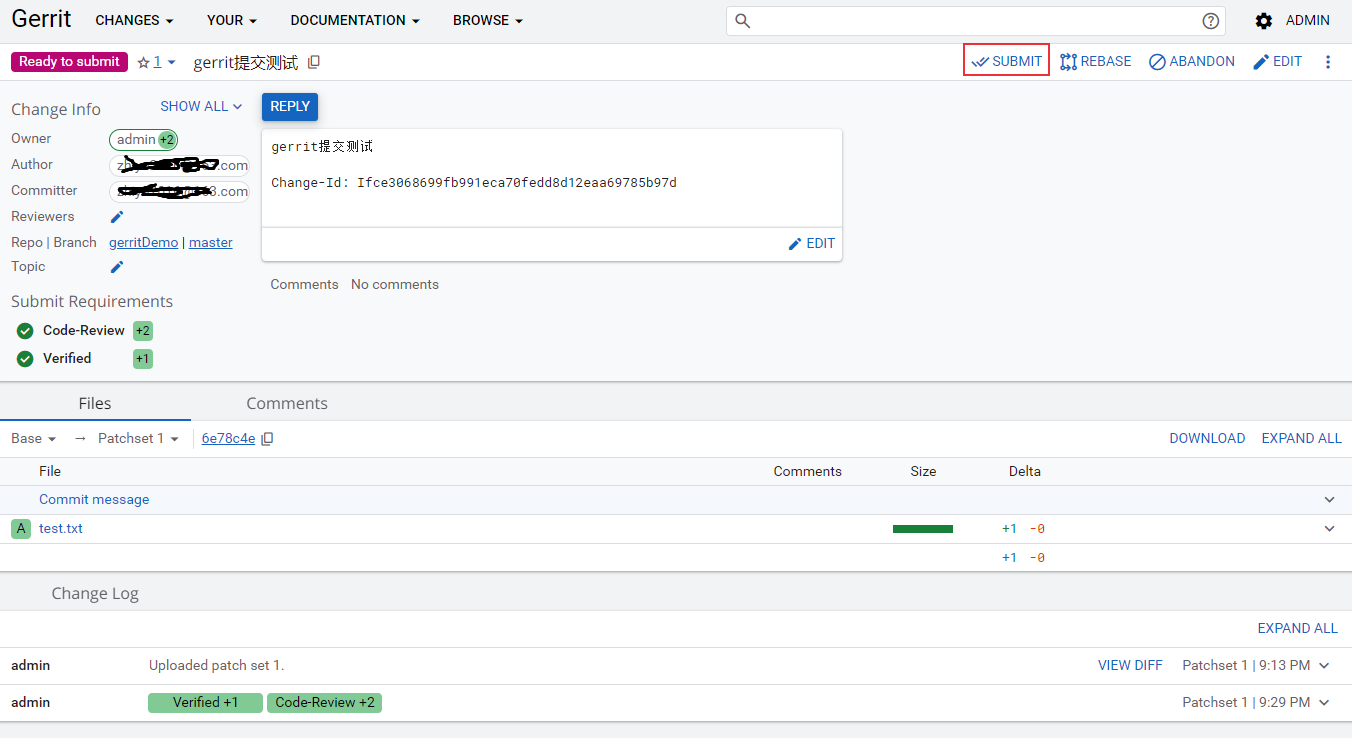
进入此次提交详细页面,可对提交的代码进行评审:

具体操作方法这里不做更多介绍了,可参考官方示例:https://gerrit-documentation.storage.googleapis.com/Documentation/3.7.2/intro-gerrit-walkthrough.html
评审通过后,点击SUBMIT提交到主仓库。
参考文档
- https://www.gerritcodereview.com/
- Working with Gerrit: An example (storage.googleapis.com)
- How Gerrit Works (storage.googleapis.com)
- Quickstart for Installing Gerrit on Linux (storage.googleapis.com)
- https://gerrit-documentation.storage.googleapis.com/Documentation/3.7.2/linux-quickstart.html
- https://gerrit-documentation.storage.googleapis.com/Documentation/3.7.2/install.html
- https://gerrit-documentation.storage.googleapis.com/Documentation/3.7.2/project-configuration.html
- https://gerrit-documentation.storage.googleapis.com/Documentation/3.7.2/project-configuration.html#manual_project_creation
- https://gerrit-documentation.storage.googleapis.com/Documentation/3.7.2/intro-gerrit-walkthrough.html
- https://zhuanlan.zhihu.com/p/83890573
- https://gerrit-review.googlesource.com/Documentation/dev-plugins.html#_apitype
本文标题:代码评审平台Gerrit安装配置方法介绍
文章作者:hiyo
文章链接:https://hiyongz.github.io/posts/devtest-notes-for-gerrit-install/
许可协议:本博客文章除特别声明外,均采用CC BY-NC-ND 4.0 许可协议。转载请保留原文链接及作者。